電驢下載基地 >> 其他资源 >> 電腦基礎 >> 《Luxology官方modo系列視頻教程--背包建模》(Luxology.modo.Training.Video.Backpack.Modeling)[光盤鏡像]
| 《Luxology官方modo系列視頻教程--背包建模》(Luxology.modo.Training.Video.Backpack.Modeling)[光盤鏡像] | |
|---|---|
| 下載分級 | 其他资源 |
| 資源類別 | 電腦基礎 |
| 發布時間 | 2017/7/13 |
| 大 小 | - |
《Luxology官方modo系列視頻教程--背包建模》(Luxology.modo.Training.Video.Backpack.Modeling)[光盤鏡像] 簡介: 中文名 : Luxology官方modo系列視頻教程--背包建模 英文名 : Luxology.modo.Training.Video.Backpack.Modeling 資源格式 : 光盤鏡像 學校 : Luxology 主講人 : Adam Ohern 發行日期 : 2010年 對白語言 : 英語 文字語言 : 英文 簡介 : . 語言:英語 網址:http:/
電驢資源下載/磁力鏈接資源下載:
- 下載位址: [www.ed2k.online][Luxology官方modo系列視頻教程--背包建模].TLF-SOFT-Luxology.modo.Training.Video.Backpack.Modeling-QUASAR.iso
- 下載位址: [www.ed2k.online][Luxology官方modo系列視頻教程--背包建模].TLF-SOFT-Luxology.modo.Training.Video.Backpack.Modeling-QUASAR.nfo
全選
"《Luxology官方modo系列視頻教程--背包建模》(Luxology.modo.Training.Video.Backpack.Modeling)[光盤鏡像]"介紹
中文名: Luxology官方modo系列視頻教程--背包建模
英文名: Luxology.modo.Training.Video.Backpack.Modeling
資源格式: 光盤鏡像
學校: Luxology
主講人: Adam Ohern
發行日期: 2010年
對白語言: 英語
文字語言: 英文
簡介:
.
語言:英語
網址:http://www.luxology.com/store/backpack/
類別:教程
(xuehui@TLF)
Luxology官方modo系列視頻教程--背包建模,一個紡織品造型和渲染視頻教程
在這部2小時01分鐘的教學中,Adam Ohern以設計一個背包造型來演示“紡織品”的建模技術,包括一些像繩之類的有趣細節和縫紉線等難建模的復雜部位。該系列教學強調modo設計真實感紡織品的技術,包括快速構建模型,部分曲面模型的細節設計,基於圖像雕塑,紋理和渲染。適合使用modo 401 SP4中級以上的用戶,modo 501用戶也需會獲的有益指導 ,但將不得不適應其一些新指令操作方式。
http://www.luxology.com/store/backpack/images/modo_backpack.gif
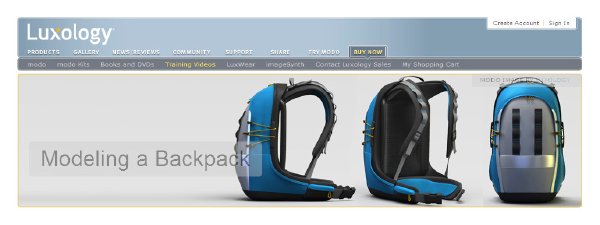
Modeling a Backpack
Soft goods modeling and rendering Video Tutorial
As many an industrial designer knows, modo is an excellent tool to illustrate designs for internal design reviews, client approval or marketing. We asked Adam Ohern to create this video tutorial that walks through many of the real-world tools and techniques that he uses when illustrating his concept designs as a working industrial designer. The design he created is a backpack, which not only offers the opportunity to introduce “soft goods” modeling techniques, it also has some hard bits and interesting details like cords and stitching. The methods used by Adam have applicability to a wide range of textile-oriented designs including handbags, gloves, flexible athletic gear and soft recreational equipment.
This tutorial was developed for modo 401. modo 501 users may find the tutorial useful, but will have to adapt some instructions to new techniques found in modo 501.
The set includes over two hours of instructional video footage, and also includes incremental step-by-step modo files for each video that let you jump in at any stage. Some Photoshop brushes are also provided as a bonus. This series emphasizes real-world techniques for soft-goods design in modo, including rapid form development, Subdivision surface model detailing, image-based sculpting, texturing, and rendering. The videos are narrated in English and are designed for people with at least an intermediate knowledge of modo.
Backpack Modeling Series
Includes:
Video Parts 01 - 03
Total Running Time: 2 hours 1 minute
Experience Level:
Intermediate modo user.
Software Required:
modo 401 SP 4. Photoshop or other image editing software.
The Video Tutorial was developed using modo 401.
modo 501 users may find the tutorial useful, but will have to adapt some instructions to new techniques found in modo 501.
||||||||||||||||||||||||||||||||||||||||||||||||||||||||||||||||||||||||||||||||||||||||||||||||||||||||||||||||||||||||||||||||||||||||||||||||||||||||||||||||||||||||||||||||||||||||||||||||||||||||||||||||||||||||||||||||||||||||||||||
更多資訊請點擊訪問

||||||||||||||||||||||||||||||||||||||||||||||||||||||||||||||||||||||||||||||||||||||||||||||||||||||||||||||||||||||||||||||||||||||||||||||||||||||||||||||||||||||||||||||||||||||||||||||||||||||||||||||||||||||||||||||||||||||||||||||
本資源下載鏈接來自TLF


Fileserve.com
http://www.fileserve.com/file/cMX7SmX/Luxo...art1.rar
http://www.fileserve.com/file/DFsBXda/Luxo...art2.rar
http://www.fileserve.com/file/cXb7SJz/Luxo...art3.rar
http://www.fileserve.com/file/bYXrZ9y/Luxo...art4.rar
http://www.fileserve.com/file/annQceK/Luxo...art5.rar
Filesonic.com
http://www.filesonic.com/file/71048159/Lux...art1.rar
http://www.filesonic.com/file/71050461/Lux...art2.rar
http://www.filesonic.com/file/71048315/Lux...art3.rar
http://www.filesonic.com/file/71048771/Lux...art4.rar
http://www.filesonic.com/file/71048535/Lux...art5.rar
BitShare.com
http://bitshare.com/files/crfg9xha/Luxolog...rar.html
http://bitshare.com/files/12x5butm/Luxolog...rar.html
http://bitshare.com/files/ya4nq3iw/Luxolog...rar.html
http://bitshare.com/files/eelf6rp5/Luxolog...rar.html
http://bitshare.com/files/pj77tez2/Luxolog...rar.html

本資源帖謝絕任何廣告及與資源無關的評論,凡涉及廣告內容的評論一概刪除處理!
.
目錄:
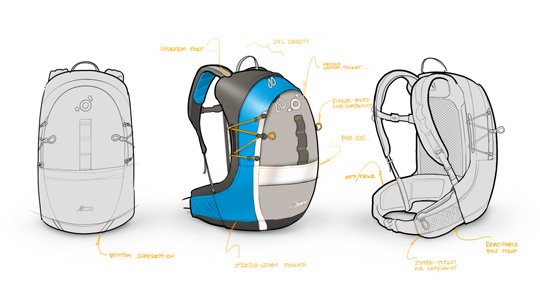
Videos in Section 01 — Form DevelopmentTopics covered include:
Setup: Importing of backdrop images, and the creation of a basic form, or “buck” around which to build the backpack.
Basic Volumes: Rough forms are quickly built for the main compartment, using sculpting tools, edge bevel, polygon bevel, loop slice, edge slice, and others.
Volume Slabs: Once the rough forms are completed, they can be used as a starting point for creating the final “slab” forms that will comprise the final design.
Other Slabs: Creating the basic geometry for the shoulder straps, waist straps, and the back rest.
Video Part 2: Modeling Details and SculptingTopics covered include:
Minor Details: Adding small folds in fabric and reflector pieces.
Straps: Building the various nylon straps that hold the backpack together, using edge extend, bevel, slice, background constraints, and other handy tricks.
Buckles: Covers importing geometry from SolidWorks and/or Rhino, as well as building the buckles manually in sub-d.
Details: The zipper pulls and bungee straps on the sides of the backpack help to bring the concept to life, and they're surprisingly easy to do using the versatile “bridge” tool.
Sculpting: Adding the folds into the fabric on the side of the backpack can be achieved quickly and efficiently using an image-based sculpting method called “displacement mapping”.
Video Part 3: Finishing & RenderingTopics covered include:
Procedurals: The nylon materials on the backpack are achieved using a type of map called a “procedural”, in this case we’ll be using “grid” in various ways to achieve complex bump maps across our various materials.
Stitching: Stitching can add a lot of depth and character to your model, particularly if you’re able to use stitching to introduce a colored accent. Here I use a simple two-step Photoshop method to implement clean, smooth stitches simply and predictably.
Render: In this video we’ll set up our render for final output, and even take a look at the final outputs in Photoshop, so you can get the most out of each render!
Conclusion: Parting words from the designer.
英文名: Luxology.modo.Training.Video.Backpack.Modeling
資源格式: 光盤鏡像
學校: Luxology
主講人: Adam Ohern
發行日期: 2010年
對白語言: 英語
文字語言: 英文
簡介:
.
語言:英語
網址:http://www.luxology.com/store/backpack/
類別:教程
(xuehui@TLF)
Luxology官方modo系列視頻教程--背包建模,一個紡織品造型和渲染視頻教程
在這部2小時01分鐘的教學中,Adam Ohern以設計一個背包造型來演示“紡織品”的建模技術,包括一些像繩之類的有趣細節和縫紉線等難建模的復雜部位。該系列教學強調modo設計真實感紡織品的技術,包括快速構建模型,部分曲面模型的細節設計,基於圖像雕塑,紋理和渲染。適合使用modo 401 SP4中級以上的用戶,modo 501用戶也需會獲的有益指導 ,但將不得不適應其一些新指令操作方式。
http://www.luxology.com/store/backpack/images/modo_backpack.gif
Modeling a Backpack
Soft goods modeling and rendering Video Tutorial
As many an industrial designer knows, modo is an excellent tool to illustrate designs for internal design reviews, client approval or marketing. We asked Adam Ohern to create this video tutorial that walks through many of the real-world tools and techniques that he uses when illustrating his concept designs as a working industrial designer. The design he created is a backpack, which not only offers the opportunity to introduce “soft goods” modeling techniques, it also has some hard bits and interesting details like cords and stitching. The methods used by Adam have applicability to a wide range of textile-oriented designs including handbags, gloves, flexible athletic gear and soft recreational equipment.
This tutorial was developed for modo 401. modo 501 users may find the tutorial useful, but will have to adapt some instructions to new techniques found in modo 501.
The set includes over two hours of instructional video footage, and also includes incremental step-by-step modo files for each video that let you jump in at any stage. Some Photoshop brushes are also provided as a bonus. This series emphasizes real-world techniques for soft-goods design in modo, including rapid form development, Subdivision surface model detailing, image-based sculpting, texturing, and rendering. The videos are narrated in English and are designed for people with at least an intermediate knowledge of modo.
Backpack Modeling Series
Includes:
Video Parts 01 - 03
Total Running Time: 2 hours 1 minute
Experience Level:
Intermediate modo user.
Software Required:
modo 401 SP 4. Photoshop or other image editing software.
The Video Tutorial was developed using modo 401.
modo 501 users may find the tutorial useful, but will have to adapt some instructions to new techniques found in modo 501.
||||||||||||||||||||||||||||||||||||||||||||||||||||||||||||||||||||||||||||||||||||||||||||||||||||||||||||||||||||||||||||||||||||||||||||||||||||||||||||||||||||||||||||||||||||||||||||||||||||||||||||||||||||||||||||||||||||||||||||||
更多資訊請點擊訪問
||||||||||||||||||||||||||||||||||||||||||||||||||||||||||||||||||||||||||||||||||||||||||||||||||||||||||||||||||||||||||||||||||||||||||||||||||||||||||||||||||||||||||||||||||||||||||||||||||||||||||||||||||||||||||||||||||||||||||||||
本資源下載鏈接來自TLF
Fileserve.com
http://www.fileserve.com/file/cMX7SmX/Luxo...art1.rar
http://www.fileserve.com/file/DFsBXda/Luxo...art2.rar
http://www.fileserve.com/file/cXb7SJz/Luxo...art3.rar
http://www.fileserve.com/file/bYXrZ9y/Luxo...art4.rar
http://www.fileserve.com/file/annQceK/Luxo...art5.rar
Filesonic.com
http://www.filesonic.com/file/71048159/Lux...art1.rar
http://www.filesonic.com/file/71050461/Lux...art2.rar
http://www.filesonic.com/file/71048315/Lux...art3.rar
http://www.filesonic.com/file/71048771/Lux...art4.rar
http://www.filesonic.com/file/71048535/Lux...art5.rar
BitShare.com
http://bitshare.com/files/crfg9xha/Luxolog...rar.html
http://bitshare.com/files/12x5butm/Luxolog...rar.html
http://bitshare.com/files/ya4nq3iw/Luxolog...rar.html
http://bitshare.com/files/eelf6rp5/Luxolog...rar.html
http://bitshare.com/files/pj77tez2/Luxolog...rar.html
本資源帖謝絕任何廣告及與資源無關的評論,凡涉及廣告內容的評論一概刪除處理!
.
目錄:
Videos in Section 01 — Form DevelopmentTopics covered include:
Setup: Importing of backdrop images, and the creation of a basic form, or “buck” around which to build the backpack.
Basic Volumes: Rough forms are quickly built for the main compartment, using sculpting tools, edge bevel, polygon bevel, loop slice, edge slice, and others.
Volume Slabs: Once the rough forms are completed, they can be used as a starting point for creating the final “slab” forms that will comprise the final design.
Other Slabs: Creating the basic geometry for the shoulder straps, waist straps, and the back rest.
Video Part 2: Modeling Details and SculptingTopics covered include:
Minor Details: Adding small folds in fabric and reflector pieces.
Straps: Building the various nylon straps that hold the backpack together, using edge extend, bevel, slice, background constraints, and other handy tricks.
Buckles: Covers importing geometry from SolidWorks and/or Rhino, as well as building the buckles manually in sub-d.
Details: The zipper pulls and bungee straps on the sides of the backpack help to bring the concept to life, and they're surprisingly easy to do using the versatile “bridge” tool.
Sculpting: Adding the folds into the fabric on the side of the backpack can be achieved quickly and efficiently using an image-based sculpting method called “displacement mapping”.
Video Part 3: Finishing & RenderingTopics covered include:
Procedurals: The nylon materials on the backpack are achieved using a type of map called a “procedural”, in this case we’ll be using “grid” in various ways to achieve complex bump maps across our various materials.
Stitching: Stitching can add a lot of depth and character to your model, particularly if you’re able to use stitching to introduce a colored accent. Here I use a simple two-step Photoshop method to implement clean, smooth stitches simply and predictably.
Render: In this video we’ll set up our render for final output, and even take a look at the final outputs in Photoshop, so you can get the most out of each render!
Conclusion: Parting words from the designer.
- 上一頁:《51單片機到ARM征服嵌入式》更新完畢[RMVB]
- 下一頁:《Luxology官方modo系列視頻教程--人眼建模》(Luxology.modo.Training.Video.Human.Eye)[光盤鏡像]
相關資源:


- [其他資源綜合]《捨與得的財富智慧》掃描版[PDF]
- [其他資源綜合]《verycd靡音閣音樂之聲創刊號》逆的生日 逆的故事特輯
- [其他資源綜合]《非線性系統設計:微分幾何、自適應及魯棒控制》((意)Riccardo Marino)清晰版[PDF]資料下載
- [生活百科]《成就人生好口才》掃描版[PDF] 資料下載
- [電腦基礎]《文字錄入與處理》[PDF]
- [生活百科]魯迅傳 王曉明
- [生活百科]《國際廣告攝影教程》掃描版[PDF] 資料下載
- [電腦基礎]《《CorelDRAW X3平面設計技能進化手冊》--樣章、樣例、教學視頻》(CorelDRAW X3)[壓縮包]
- [電腦基礎]《手把手教你學單片機之入門篇》更新完畢[RMVB]
- [生活百科]《家制風味泡菜300種》掃描版[PDF] 資料下載
- [計算機與網絡]《軟件測試與持續質量改進(第3版)》(Software Testing and Continuous Quality Improvement, Third Edition)掃描版[PDF]
- [網絡軟件]Windows Live Messenger(MSN) 簡體版 8.5
- [系統工具]《鮮花屏保1.0》簡體中文綠色版[壓縮包]
- [人文社科]《改變自己:心理健康自我訓練》掃描版[PDF]
- [生活圖書]《調味品、食品添加劑與人體健康》掃描版[PDF]
- [硬盤游戲]《天空王牌1918》(Sky Aces 1918)完整硬盤版[壓縮包]
- [軟件綜合]優酷視頻免登錄VIP版V42穩定版
- [生活百科]飛豆快遞單打印軟件 V5.75 免費下載
- [人文社科]《立法者與闡釋者-論現代性、後現代性與知識分子》(Legislators and Interpreters)((英)齊格蒙特·鮑曼)中譯本,掃描版[PDF]
- [生活圖書]《心經:送你一首渡河的歌》(the Sutra of My Heart
- 《After Effects影視特效制作典型實例》隨書光盤[壓縮包]
- 《動畫徽標制作教程》(Lynda.com Start to Finish Big Spaceship Animated Logo)[ISO]
- 《VC++深入詳解 隨書教學視頻DVD光盤》
- 《CretureHead》(gomon CretureHead)[光盤鏡像]
- 《JQUERY基礎教程 中文版 附帶源代碼》(Learning jQuery)JPG 掃描版
- 《Access 2003 視頻教程》(CBT Nuggets MOS Series Access 2003-ViH)[ISO]
- 《黑客任務實戰——攻略篇》
- 《3D.ZBRUSH教學錄像》(3D.ZBRUSH)[Bin]
- 《[窗內網]SQL 2008完全學習手冊 視頻教程》
- 《Lynda.com - Premiere Pro CS4 基礎教程》(Lynda.com - Premiere Pro CS4 Essential Training)
- 《影視視頻編輯大師級教程》(VASST Video Editing Master Class)[ISO]
- 《【教學】建立互動式模擬和媒體展示(Captivate)》[ISO]
免責聲明:本網站內容收集於互聯網,本站不承擔任何由於內容的合法性及健康性所引起的爭議和法律責任。如果侵犯了你的權益,請通知我們,我們會及時刪除相關內容,謝謝合作! 聯系信箱:[email protected]
Copyright © 電驢下載基地 All Rights Reserved