資料介紹
相關專題學習資料:- 3D處理軟件工具
軟件類型:系統工具>桌面屏保
軟件性質:破解軟件
操作系統:Windows
應用平台:Windows XP, Windows Vista, Windows 7 (all 32-bit & 64-bit)
問題反饋:http://www.serenescreen.com/support/
網站鏈接:http://www.serenescreen.com/product/
軟件介紹:
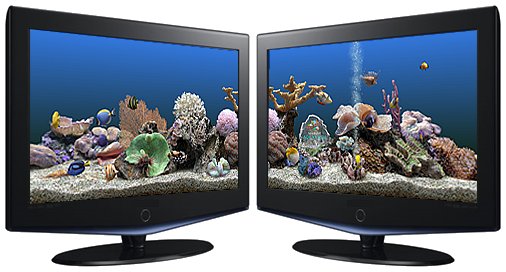
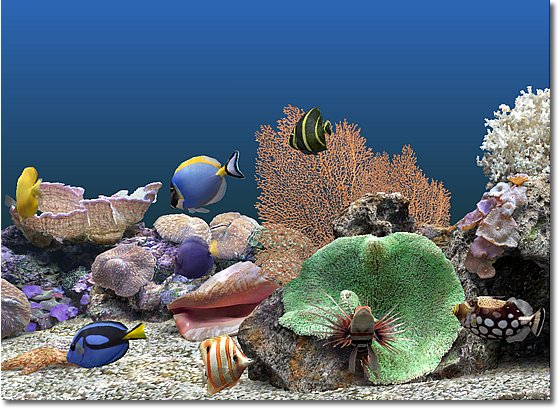
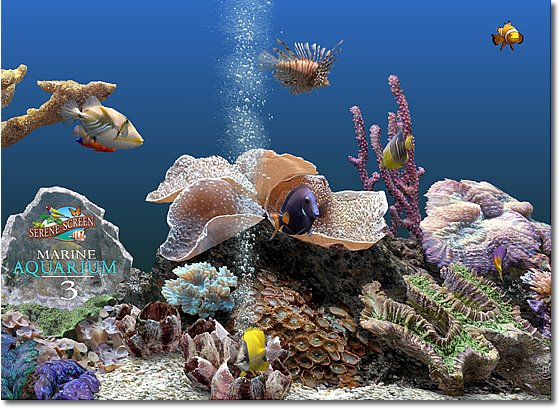
SereneScreenMarineAquarium是著名的熱帶魚水族箱屏幕保護程序,它屢獲軟件大獎,在許多的軟件下載網站的排行榜中也名列前茅,甚至此屏保還被微軟收入其WinXPPlusPack之中。
MarineAquarium包含對多顯示器、寬屏幕顯示器和自定義屏幕比例的支持,還新增加了兩種讓你喜歡的新魚類:輻紋蓑鲉和雞心倒吊,現在魚類總數達到了28種。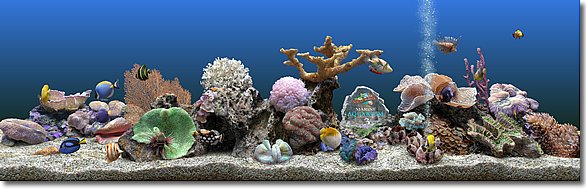
Marine Aquarium 3.2 User's Guide (Revised - June 2011)
Copyright 2011 Prolific Publishing, Inc.
http://www.SereneScreen.com
Contributions to this User Guide by John Hedinger
Version 3.2 adds a Zebra Moray eel to the tank. It lives in the cave, but is fairly shy and is sometimes too deep in the cave to be visible. The Zebra Moray was chosen because they have no teeth are are compatible with many saltwater aquarium fish.
I. System Requirements
1. What are the system requirements?
2. Will Marine Aquarium work with Windows NT?
3. Will Marine Aquarium run on my notebook computer?
4. Why doesn't Marine Aquarium work with my VooDoo2 (or other loop-thru) card?
5. Will Marine Aquarium run on Dual Monitors?
II. Troubleshooting/FAQ
1. The Fish swim slowly and/or Marine Aquarium freezes.
2. Marine Aquarium will not install from the CD.
3. Marine Aquarium asks me to enter key code or buy after authorizing from the CD.
4. Do I need a Key code with my CD purchase?
5. I removed the original "Guitar" music (CanonGuitar.sgt) from the Music Playlist, how do I get it back?
III. Marine Aquarium Settings
1. Display Settings
2. Program Settings
3. Fish Settings
4. Music Playlist Settings
5. Background Settings
6. Clock & Logo Settings
7. Register
8. About (Include Hot Key List)
IV. Customizing Your Marine Aquarium's Crystal
V. Licensing & Distribution
1. Is there a site License available for my company?
2. May we distribute the shareware demo version, without charge, to our customers so they can register the full version at a later date?
3. Can I get a custom version of Marine Aquarium, with my logo in the background?
*********************************************************************************
I. System Requirements
1. What are the system requirements?
• Windows 2000, XP (Home or Professional), Vista or Windows 7.
• A Pentium-class CPU (200 MHz or faster).
• 64 MB of system RAM. 128 MB system RAM for Windows XP or Vista.
• A DirectX 9c compatible, 3D Accelerator Video Card with 64 MB or more of on-board RAM.
• 8 MB of free Hard Disk Space.
• DirectX 9c or better installed on your computer.
• The latest drivers for your video card. These are best found at the video card manufacturer's site. The Windows update feature is not sufficient for this task. For more information, see the Frequently Asked Questions page on our website http://www.serenescreen.com/support/faq ... oductid=64
2. Will Marine Aquarium work with Windows NT?
Bear in mind that Windows NT 4 is a very old operating system, which does not support DirectX. Marine Aquarium is a DirectX application, so it will not work under Windows NT 4. For the latest version of DirectX see the Microsoft page http://www.microsoft.com/windows/directx/
3. Will Marine Aquarium run on my notebook computer?
MA3 will run on almost all modern notebooks.
4. Why doesn't Marine Aquarium work with my VooDoo2 (or other loop-thru) card?
MA3 will probably not run on any VooDoo card, due to their 256x256 limit on texture size. While the system requirements for MA3 are lightly higher than MA2.6, it will run on the vast majority of video cards made in the past decade.
5. Will Marine Aquarium run on widescreen and/or multiple monitors?
Yes!! No setup is required for widescreen. The background is 2.5 widescreen monitors wide, and as much of it will show as will fit across your monitors. You can use the arrow keys to manually scroll the scene.
II. Troubleshooting/FAQ
1. The Fish swim slowly and/or Marine Aquarium freezes.
Slow animation or freezing can be caused by a variety of things. Try a few of these basic fixes:
• IMPORTANT: Be sure that your video card has 64 megabytes or more of video memory and an up-to-date driver. Do not skip this step! Even if your computer is brand new or you've recently updated drivers, there can still be problems in this area.
• Try using a lower Screen resolution.
• If you are using a 32-bit color screen environment, try changing the setting to 16-bit.
• If your video card is set to use Full-Screen-Antialiasing, turn it off.
(See the Frequently Asked Questions page on our website (http://www.serenescreen.com/support/faq.php) for more information on your video card and how to check it.)
• Try reducing the number of fish in the tank to a lower number.
• Examine the programs in your System Tray (The area just to the left of the clock on the Taskbar). Placing your mouse cursor over the icons will give you item's full name. If you have Windows XP or Vista you may have to "Show hidden icons" using the small circle and arrow button to the left of the System Tray. If you are using Windows 7 you may have to "show hidden icons" using the small "up triangle" to the left of the System Tray.
• If the icon is Windows or another program waiting to update, run the updates then continue.
• If the icon is not one of your basic system functions (volume, task manager, mouse, video card, printer, etc.) exit, disable, or close the program. Right-clicking will usually give you options. Then, check if Marine Aquarium exhibits the same behavior.
• Double-check your computer for spyware or viruses.
• Under Windows Vista, Microsoft's MsMpEng.exe program will scan your computer at boot-up. Its scanning activity may cause other programs to appear slow. Wait a couple of minutes for it to return to standby.
• NOTE: If none of the above solves your problem, please contact us using our Tech Support page http://www.serenescreen.com/support/tech.php, or visit the Fan Forum at http://www.feldoncentral.com/forums.
2. Marine Aquarium will not install from the CD.
Please try installing the download version of Marine Aquarium and authorizing it using your CD. For more information on this procedure, see the Frequently Asked Questions page on our website http://www.serenescreen.com/support/faq.php
3. Marine Aquarium asks me to enter key code or buy after authorizing from the CD.
This is most likely a corrupted registry entry, usually caused by installing with an anti-virus program running. Uninstall Marine Aquarium, and then reinstall it with the antivirus software disabled. Remember to enable the antivirus program once the installation is complete.
4. Do I need a Key code for my CD?
No. Key codes are for unlocking the Marine Aquarium downloads. For upgrades and special offers, we have alternative ways of helping CD customers on our website, http://www.SereneScreen.com.
5. I removed the original "Guitar" music (CanonGuitar.sgt) from the Music Playlist, how do I get it back?
• The simplest way is to delete all the files in the playlist. The default music will automatically be added.
• If you don't want to lose your playlist, you can do this: Find the MA3 folder on your system.
On a default installatin of Windows XP it should be:
C:/Documents and Settings/"youraccountname"/Application Data/Marine Aquarium 3/
On a default installation of Vista or Windows 7 it should be:
C:/Users/"youraccountname"/AppData/Roaming/Marine Aquarium 3/
• Find the file named MA3Playlist.lst in the Marine Aquarium 3 folder.
• Open the MA3Playlist.lst file. (We recommend opening the file with Windows Notepad.)
• After opening the file, you will see a list of the music you have selected in your Playlist. Add the following line: CanonGuitar.sgt
• Save and close the file. Make sure you save the file as "MA3Playlist.lst", replacing the original file.
• The CanonGuitar music will now show in the Music Playlist.
• NOTE - If you do not feel comfortable editing the MA3Playlist.lst file, then simply Delete it. The next time Marine Aquarium 3 starts, it will create a new MA3Playlist.lst file with CanonGuitar.sgt as the only selection in the Playlist. Remember, if you delete the MA3Playlist.lst file, you will have to add all of your music selections back to the newly created Playlist.
III. Marine Aquarium Settings - You may enter the Marine Aquarium Settings menu in one of four ways:
1. While Marine Aquarium is running, press the spacebar on your keyboard to bring up the Marine Aquarium settings menu.
2. While Marine Aquarium is running, "right click" your mouse (click the "secondary" mouse button) somewhere within the Marine Aquarium image. This brings up a "mini menu" window - select "Settings".
• NOTE - On the Mini Menu, the "Resume" button returns you to the Marine Aquarium program, the "Exit" button shuts down the Marine Aquarium program, and the "Fullscreen <-> Windowed" button will toggle Marine Aquarium between the two screen selections.
3. From the Windows Screen Saver settings menu, with "Serenescreen Marine Aquarium 3" as your screen saver, select the "settings" tab.
4. Right-click on the Marine Aquarium desktop shortcut and select "Configure".
• The Main Marine Aquarium Settings screen that is then displayed has the following buttons:
"Display Settings"
"Program Settings"
"Fish Settings"
"Music Playlist"
"Background Colors"
"Clock & Logo"
"Register"
"About"
Each of these buttons is discussed below.
The "OK" button closes the Marine Aquarium Settings screen and returns to Marine Aquarium if you entered the settings screen using methods 1 or 2 above.
The "Visit Website" button will take you to the Serenescreen Marine Aquarium website - http://www.serenescreen.com/
1. Display Settings
• NOTE - changes you make on this screen will only take effect when you click on the "OK" button. Clicking "Cancel" will not save your changes and all settings will remain as they were.
Marine Aquarium can be run on either a single monitor system or a multi-monitor system. The "Display Settings" screens are somewhat different for each:
• Single Monitor Setup - shows Video adapter information.
Display Mode -
"Display Mode for this Video Adapter" - Controls the Desktop resolution and Color depth settings for the specified monitor. "Automatic" will use a mode that works well with your video adapter and current screen saver preferences. You may use the Pull-down menu to select a specific resolution and color depth setting if necessary.
"Wait for vertical sync" box is normally not checked. If you experience graphical "tearing" where the animation of the fish and background appear as a series of horizontal stripes, instead of a smooth, fluid image, try enabling "Wait for vertical sync". This setting instructs your computer to wait until the animation frame has been completely drawn before displaying it on your monitor.
• Multi-Monitor Setup - shows video adapter information for each video adapter.
Each of your monitors, if you have a multi-monitor set up, can be set separately by choosing the monitor from its tab. Once selected, you can change the individual settings for Full Screen operation as outlined below.
"Monitor 1", "Monitor 2" - Tab lets you choose one of your monitors to configure.
Monitor usage -
"Display screen saver on this monitor" (when used as a Screen Saver) - Displays Marine Aquarium on the monitor, when Full Screen.
"Display nothing on this monitor" - Blacks out the specified monitor. (NOTE: If you are seeing black on one monitor and not the others, most likely this option has been checked for one of your monitors.)
Display Mode -
"Display Mode for this Video Adapter" - Controls the Desktop resolution and Color depth settings for the specified monitor. "Automatic" will use a mode that works well with your video adapter and current screen saver preferences. You may use the Pull-down menu to select a specific resolution and color depth setting if necessary.
"Wait for vertical sync" box is normally not checked. If you experience graphical "tearing" where the animation of the fish and background appear as a series of horizontal stripes, instead of a smooth, fluid image, try enabling "Wait for vertical sync". This setting instructs your computer to wait until the animation frame has been completely drawn before displaying it on your monitor.
2. Program Settings
• NOTE - changes you make on this screen will only take effect when you click on the "OK" button. Clicking "Cancel" will not save your changes and all settings will remain as they were.
"Exit on Mouse Move" - If this is checked, you can exit the Marine Aquarium by moving your mouse or pressing a non-hotkey (see information on hotkeys in the "About Settings" below) on your keyboard. If this option is not checked, you can only exit the screensaver by pressing the ESC key or "right click" (secondary mouse button) on the mouse to bring up the "mini menu" and then select "Exit".
"Auto Pan" - Turns auto-panning of the Marine Aquarium scene on (checked)/off (not checked), and sets the pan speed using the slider.
"Start in Windowed Mode" - When on (checked) allows Marine Aquarium program to launch in windowed mode. When off (not checked) allows Marine Aquarium to launch in Full Screen mode. (NOTE: This setting does not affect Marine Aquarium running as a screen saver.)
"Window Always on Top" - When on (checked) and the Marine Aquarium is in Windowed Mode this option will place the Aquarium window over any other program you are running. When off (not checked) and the Marine Aquarium is in Windowed Mode the window will operate like other windows and another Window can be moved on top of the Marine Aquarium window.
"Display Window Titlebar" - When on (checked) will display the Windows Title Bar when the Marine Aquarium is running in Windowed Mode. When off (not checked) the Windows Title Bar will not be displayed when the Marine Aquarium is running in Windowed Mode.
• NOTE - When running Marine Aquarium 3.1 in "Windowed Mode", you can move the window around on the screen or resize the window just as you can any other program running in a window. If "Display Window Titlebar" is on, left click (primary mouse button) anywhere on the Title Bar and while holding down the mouse button, "drag" the Window to move it. If "display Window Titlebar" is off, left click (primary mouse button) anywhere in the MA 3.1 Window and while holding down the mouse button, "drag" the window to move it. To resize either window, left click (primary mouse button) on any of the edges or corners of the window and while holding down the mouse button, "drag" the edge or corner to resize the window. Whether moving the window or resizing it, when you select the window to move or resize with the mouse button, the animation will stop and will resume when you release the mouse button.
"Limit Frame Rate" - When on (checked) allows you to use the slide bar to select a Frame Rate in Frames per Second (FPS) between 30 FPS (far left) to 124 FPS (far right). When off (not checked) Marine Aquarium 3 will determine a default Frame Rate. Marine Aquarium defaults to 60 FPS.
"Show Crystal" - When on (checked), displays the crystal. When off (not checked), replaces the crystal with a green Finger Coral.
"Bubble Column" - Turns the bubble column on (checked)/off (not checked)
"Bubble Sound" - Turns the bubbling sound on (checked)/off (not checked). The Slider sets the volume of the Bubble sound.
• NOTE - The Bubble Sound will only be heard when the Bubble Column is being displayed.
"Music" - turns music on (checked)/off (not checked). The Slider sets the volume of the Music. Music will only be heard when the Music is set to "on".
3. Fish Settings - "Choose Fish" screen
• NOTE - changes you make on this screen will only take effect when you click on the "OK" button. Clicking "Cancel" will not save your changes and all settings will remain as they were.
• NOTE - The Zebra Moray eel is not selectable from the menu. It is considered one of the background objects, and is always on.
• In this Window, you can select which fish, and how many of each fish, that will appear in your virtual Marine Aquarium. You may have up to 30 fish and one lonely starfish in your Aquarium at one time.
• To select a Fish, click on the image of the fish. In the box to the left of the fish images you will now see information relating to the fish you selected, including the fish's common name, its scientific name, its general location, its diet, and the size of the fish when it is an adult.
"Number in Tank" - Use the up and down arrows to select the number of the selected fish you want in your virtual tank. You may have up to 30 of one fish in your aquarium. The number you select will show immediately to the right of the up/down arrows and also in a small square just to the lower left of each fish you select.
"Disable this fish" - If you do not want a specific fish to be displayed in your tank, check this box. You will see the number change to "0" and an "X" appear in the small square just to the lower left of the selected fish.
• NOTE: As you add or remove fish to the "tank", you will notice the "Total Fish in Tank" number will increase or decrease accordingly.
"Total Fish in Tank" - allows you to set the maximum number of fish to appear in your Tank up to 30. You may use the up and down arrows to set this number. The number just to the right of the up and down arrows will reflect the number you have chosen.
"Fish Sets" - You may create and save your own Fish Sets to appear in your Tank.
"New Set" - To create a Fish Set, click this button and type the name of the new fish set in the place provided (directly below the "New Set" button and then press "Enter" to save the Fish Set name. (It should now be showing (alphabetically) in the list of Fish Sets.) Now, select the fish you want in your Fish Set using the "Select a Fish" and "Number in Tank" steps above. Clicking on any other Fish Set will temporarily save your new Fish Set and clicking "OK" to exit this screen will save the information in your newly created Fish Set.
• To change an existing Fish Set, select it (highlight it) and then make the changes. Clicking on any other Fish Set will temporarily save your changes and clicking on "OK" to exit this screen will save the changes.
• To select a Fish Set to be the one displayed in your Tank, simply click on it (it will become highlighted in blue). When you exit this screen (by using "OK"), the selected Fish Set will be the one displayed in Marine Aquarium.
"Delete" - To remove a previously created Fish Set from the list, click on it (highlight it) and then press the "Delete" button.
"Cycle Fish Sets" - if this box is checked (on) then every time Marine Aquarium starts it will display the next Fish Set in the list. When the box is not checked (off), which is the default setting, only the highlighted Fish Set will be displayed in Marine Aquarium each time it is run.
"All On" - clicking "All On" when selecting the fish to be displayed or creating a Fish Set will select all of the fish.
"All Off" - clicking "All Off" when selecting the fish to be displayed or creating a Fish Set will deselect all of the fish.
"All Random" - Clicking "All Random" when selecting the fish to be displayed or creating a Fish Set will randomly select the fish to be displayed in your aquarium. Each time Marine Aquarium starts, a new group of randomly selected fish will be displayed. The default number of random fish to be displayed is 16 fish in the tank with all 16 being selected randomly.
• NOTE: Fish with an "X" in the lower left box will not be selected for random display.
• NOTE: You can mix both selected fish and randomly selected fish. For example, you could select 5 fish displaying 2 of each (10 selected fish) and then 10 random fish for total of 20 fish in tank. The 10 fish you select will then always display in your tank while the remaining 10 fish will change randomly each time Marine Aquarium runs.
4. Music Playlist
• NOTE - changes you make on this screen will only take effect when you click on the "OK" button. Clicking "Cancel" will not save your changes and all settings will remain as they were.
• In this menu you may add, or remove music (or any audio sound) from your playlist.
"Add" (Adding Music) - This button allows you to add music to your playlist. Navigate to the files you want and add them to the playlist. Currently Marine Aquarium 3 supports MP3 files as well as WAV, MP2, MPA, AIF, AIFF, and MID formatted files.
"Play" - Click button to begin playback of the highlighted music/audio selection. Only affects play while in this screen.
"Stop" - Click button to stop playback of the highlighted music/audio selection. Only affects play while in this screen.
"Remove" - Click button to remove the highlighted music/audio selection from your playlist.
• NOTE - you can not remove CanonGuitar.sgt from the list when it is the only selection. Also, if you remove the last selection from the list, CanonGuitar.sgt will re-appear as the only selection on the list. This prevents confusion if you turn music on and there aren't any selections listed.
"Move" - Click up or down buttons to move highlighted music/audio selection up or down the playlist order.
"Random Play" - When on (checked), selects and plays tracks at random from your music/audio playlist. When off (not checked), selects and plays tracks in order starting with the highlighted music/audio selection. (Usually the first, or top, item in the playlist.)
"Music Volume" - Below the playlist is a slider to control the playback volume level. (NOTE: The volume control can also be accessed through the "Program Settings" screen in the "Music" section. (See Section III. 2. "Program Settings" above.))
"Music ON" - (Under words "Music is OFF!) Only shows if Music is not checked (off) in the Program Settings menu. Allows you to turn Music on from this screen.
(NOTE - Advancing to the next track during playback - This function is not accessed through the settings menu. It is done through the use of a Hotkey - "N" (see information on hotkeys in the "About Settings" below). While the program is running you may hit the "N" key to advance your playlist to the next selection.
• The playlist will repeat once it reaches the last selection. If in "Random Play" mode it will randomly play selections continuously.
5. Background Colors Settings - "Set Background Colors" Screen
• NOTE - changes you make on this screen will only take effect when you click on the "OK" button. Clicking "Cancel" will not save your changes and all settings will remain as they were.
• In this menu, you may create up to six background color sets which can be displayed in your aquarium. A color "set" consists of two colors - the color of the uppermost viewable level of the background and the color of the lowermost viewable level of the aquarium background. The Marine Aquarium program will then blend the two colors together
• By default, Marine Aquarium 3.1 includes background color sets #1 and #2. You may change these sets just as you can create/change the other 4 sets. If you want to return Color Set #1 or #2 to their default settings, simply press the "Reset" button under the appropriate set.
"On" (Under each Color Set) - When checked the selected color set will be active and display when Marine Aquarium is running. When not checked, the color set is not active and will not be displayed when Marine Aquarium is running.
"Sec" (Seconds) - This left/right arrow setting allows you to determine how long each Color Set will be displayed when Marine Aquarium is running. The left arrow reduces the number (lowest is "1") and the right arrow increased the number (highest is "720"). After a color set has been displayed for the selected amount of time, Marine Aquarium will transition the colors to the next active color set.
• NOTE: Creating a few different Color Sets and setting them all to 1 Second effectively gives a continuously changing color background screen.
"Red", "Green", and "Blue" Sliders - Clicking and dragging a slider moves it from the furthest left ("0" setting) to the furthest right ("255" setting), corresponding to the amount of the selected color to be shown in your active color set rectangle.
• NOTE: With 256 selections (including "0") for each color, you have over 16 million possible background colors for your aquarium!
• To create a color, first click on either the upper or lower rectangle of a Color Set. Then move the Red, Green, and Blue sliders until your selected rectangle becomes the color you want. Simply click on any other color rectangle or "OK" (which exits the screen) and that color will now be set. Don't forget, you must exit this screen with "OK" or all the changes you make will be lost.
• HINT: With Red, Green, and Blue, where's Yellow? Leave the Blue slider on "0" (all the way to the left) and move the Red and the Green Sliders all the way to "255" (all the way to the right).
"Change Colors Automatically" - When on (checked) activates the background color changing mode. When off (not checked), locks the current color of the background to the currently selected set.
6. Clock & Logo - "Clock/Logo Playlist" Screen
• NOTE - changes you make on this screen will only take effect when you click on the "OK" button. Clicking "Cancel" will not save your changes and all settings will remain as they were.
• From this menu you may select which of the built-in items: Analog Clock, Digital Clock, Calendar, or the MA3 Logo, will show on the Crystal when the crystal is displayed. You may also load other images of either .BMP or .PNG files to show on the crystal.
"Load Logo" - Allows you to import a logo or image to use on the crystal. The logo or image must be either a .BMP or .PNG file. (See “Section IV. Customizing Your Marine Aquarium's Crystal" below for more detailed information on this procedure.)
"Analog Clock" - Clicking this button will add an Analog Clock to the list in the line above the highlighted item. You may add multiple Analog Clocks to the list.
"Digital Clock" - Clicking this button will add a Digital Clock to the list in the line above the highlighted item. The Digital Clock shows Time in 12 hour Digital Clock Format and shows Month/Day/Year in Digital format. You may add multiple Digital Clocks to the list.
"Calendar" - Clicking this button will add a Calendar to the list in the line above the highlighted item. The Calendar is a Month at a glance Calendar, displaying a circle around the current day. You may add multiple Calendars to the list.
"Remove" - Clicking this button will remove the selected (highlighted) Logo, Clock, Calendar, or Image, etc. from playlist.
"Move Arrows" - Moves selected (highlighted) item either up or down within the playlist.
"Random Play" When on (checked) will randomly select the order to display the items in the playlist on the Crystal. When off (unchecked), the order of play is from top to bottom and will repeat continuously.
"Show this logo for" is an up and down arrow that set the amount of time the highlighted item will be displayed on the crystal. Each individual item can be set for 0 to 240 seconds. NOTE - if set for "0" seconds the item will not be displayed on the crystal, but it will remain in the playlist.
• Analog Clock Options -
"Etched Look" - When on (checked), the Analog Clock will appear as if it is etched into the crystal. When off (not checked) the Analog Clock will appear as if it is attached to the face of the crystal.
"Second Hand" - (Only available when "Etched look" is not checked) When on (checked), the second hand will be shown on the analog clock when the clock is displayed on the crystal. When off (unchecked), the second hand will not be shown on the analog clock when the clock is displayed on the crystal.
• Digital Clock/Calendar Options -
"Solid Font" - You can select the color of the Digital Clock and the Calendar when it is displayed on the crystal. Move the slider from white (first position on the left) to black (last position on the right) or any of the other colors in between. The "Font Color" slider will not be available when "Etched Font" is active.
"Etched Font" - The Digital Clock and the Calendar will appear as if they are etched into the face of the crystal. (Note: Font Color picker becomes lighter and you can not use color slider when "Etched Font" is selected).
Crystal is OFF! "Show Crystal" - this will display just to the left of the "Cancel" button if "Show Crystal" is not checked in the Program Settings Menu. Clicking "Show Crystal" will show the crystal in the Marine Aquarium display and will turn on (check) the "Show Crystal" box in the Program Settings Menu.
7. Register
• Selecting this button will bring up either a screen showing your Registration information if your copy of Marine Aquarium is registered or a screen showing information on how to register your demonstration copy of Marine Aquarium. The Registered version gives one access to all of the Marine Aquarium features including the ability to select from all 28 of the fish species. The Unregistered version limits your fish choices to only the top row of fish and you will be prompted to enter the password "testfish" when starting Marine Aquarium or entering the Marine Aquarium Settings Menu.
8. About - "About Marine Aquarium 3" Screen
• The "About" screen displays information regarding SereneScreen Marine Aquarium 3.1 including the Version number and the http://www.SereneScreen.com website address. It also displays the list of Keyboard Shortcuts or "Hotkeys" that can be used while Marine Aquarium 3.1 is running.
Marine Aquarium Keyboard Shortcuts (Hotkeys) - Pressing these keys on your keyboard, while Marine Aquarium is running, will do the following:
Up Arrow - Marine Aquarium Volume up (louder)
Down Arrow - Marine Aquarium Volume down (softer)
• NOTE - These volume levels only affect the Aquarium sound, not the main Windows volume settings.
Left Arrow - Scroll scene to left.
Right Arrow - Scroll scene to right.
B - Bubble sound on/off.
C - Display Clock for 10 seconds.
Shift-C - Display Clock (Hold) until L key is pressed.
F - Toggle between Full screen and windowed mode.
F1 - Next background color set.
F2 - Toggle Auto background color change on/off.
L - Next item in logo playlist.
M - Music On/Off.
N - Next audio selection.
P - Pause. Toggle automatic scrolling on/off
S - Statistics Display.
Spacebar - Settings menu.
W - Wireframe/normal mode Toggle on/off. Note - Wireframe mode only stays on for 10 seconds.
CTRL-R - Restore default settings.
CTRL-C - Reset window position.
ESC or ALT-F4 - Exit program.
Right Mouse Button - Mini Menu.
• TECH NOTE - Be careful. "CTRL-R" Restores Marine Aquarium to essentially the same as it was the first time you installed it. You will not lose your saved Fish sets, Background Color Sets, Music Playlist, or clock/Logo Playlist, however. The following values are reset to their default settings:
MouseExit = FALSE;
AlwaysTop = FALSE;
TitleBar = TRUE;
ShowCrystal = TRUE;
Autopan = TRUE;
PanSpeed = 0.3;
CurrentBGSet = 0;
TopColor = default color;
BottomColor = default color;
BubbleSound =FALSE;
Music =TRUE;
Volume 1500;
MusicVolume 1500;
CycleFishSets = FALSE;
Drawbubbles = TRUE;
EyePt = 3.6, 1.01, -20.0;
CurrentLogo =0;
FrameRate = 60
LimitFrameRate = TRUE
IV. Customizing Your Marine Aquarium's Crystal
• NOTE - changes you make on this screen will only take effect when you click on the "OK" button. Clicking "Cancel" will not save your changes and all settings will remain as they were.
• The Clock and Logo Playlist interface makes it very easy to load and display custom graphics on the Crystal. To place your logo, artwork, or any other image on the Marine Aquarium Crystal, while in the "Clock and Logo Playlist" interface do the following:
1. Click the "Load Logo" button. A window will appear with the title "Open."
2. Navigate your files and locate the logo, artwork, or image file you want to be shown on the crystal when the crystal is displayed.
3. Click on (select) the desired file and then click the "Open" button. Marine Aquarium 3.1 will load the file into its memory and set it to display for the default amount of time (10 seconds). The selected item should be the highlighted item in the list.
4. Click the "OK" button to exit the Marine Aquarium Settings menu. Your new Logo should now be displayed on the Crystal. If it is not, press the "L" key on your keyboard to cycle through the items you've selected to show on the crystal.
• NOTE - You can load multiple .BMP or .PNG files, and set them to play in any order. If the image is very large you may see a slight hesitation or stop in the animation when the image is being loaded. Reducing the size of the image will eliminate that hesitation. PNG files of 256x256 pixels are recommended. Instructions on using a paint program are beyond the scope of this document, but PaintShop Pro, Photoshop or any other paint program can be used. Logos in .PNG form which use an Alpha channel (transparency around the image) work best. Partial transparency is also supported. The SereneScreen Aquarium running in a store window while displaying your company logo in the crystal can be an effective form of advertising.
V. Licensing & Distribution
1. Is there a Site Licensing available for my company?
Prolific is happy to offer a discount to purchasers of multiple licenses of Marine Aquarium. For every purchase of a set of ten (10) full licenses, of any version, we will provide five additional copies of the same licensed product. For each set of 50, we will provide 75 licensed copies. If you would like to purchase more than that, or you are a school or government organization, please call (818.562.8400) or e-mail us ([email protected]) to discuss even more favorable terms.
Written correspondence should be sent to:
Attn: SereneScreen
c/o Prolific Publishing
P.O. Box 5000
Burbank, CA. 91508-5000
USA
2. May we distribute the shareware demo version, without charge, to our customers so they can register the full version at a later date?
Yes, you may freely distribute the Demo (which has several fish), as long as you do not charge anything for the demo.
3. Can I get a custom version of Marine Aquarium, with my logo in the background?
This version of Marine Aquarium includes the ability to customize the Crystal with a logo or other artwork. For more information on this feature, see Section IV Customizing Your Marine Aquarium's Crystal above. If you would like multiple copies of Marine Aquarium for your business, see entry 1 in this section.
(Revised 06/11)
- 上一頁:《磁盤工具軟件(安全刪除敏感數據)》(O&O Software SafeErase )Server|Workstation v5.1.672 x86|x64[壓縮包]
- 下一頁:《系統清理工具》(CleanMyMac )v1.10.3 Lion ready[壓縮包]


- [軟件綜合]《圖像處理軟件》(Light Image Resizer)4.4[壓縮包]
- [行業軟件]《印刷電路板PCB設計軟件》(CadSoft Eagle Professional)v5.9.0[安裝包]
- [編程開發]《風河VxWorks》(Tornado2.2 for ALL),編程開發、資源下載
- [多媒體類]《音樂管理工具》(BinaryWorks eXtreme Music Manager)v1.0.1.4[壓縮包]
- [軟件綜合]《紅帽企業Linux》(Redhat Enterprise Linux)V5 UPDATE 6[光盤鏡像]
- [多媒體類]《RAW相片轉換編輯軟件》(Phase One Capture One PRO+Phase One Media Pro)v6.4.56957 Multilingua Win86/64+1.0.1.50536 (Mac OSX)[壓縮包]
- [行業軟件]《多領域系統仿真平台》(LMS Imagine.Lab AMESim R8A)[ISO]
- [多媒體類]《音樂創作軟件》(Ableton Suite)v8.1.4[光盤鏡像]
- [行業軟件]Macromedia套件裝
- [操作系統]《Opera浏覽器8.5簡體中文版》(Opera8.5)8.5,操作系統、資源下載
- [教育科技]《朗道理論物理教程(俄文原版)》(Теорети
- [電腦基礎]《美河提供.oreilly.JSP設計第二版》
- [學習教程]《3dmax液化氣罐建模與紋理》課程共13集 資料下載
- [其他圖書]《神奇的點穴氣功》掃描版[PDF]
- [經濟管理]《超級競爭力:經濟全球化潮流中跨國經營的文化支持》(何曼青)掃描版[PDF]
- [行業軟件]《全面網絡系統部署方案》(Acronis Snap Deploy Server v3.0.3292)[壓縮包]
- [學習教程]《Windows Azure基礎教程》(Pluralsight.net Windows Azure Fundamentals)[光盤鏡像]
- [行業軟件]《藥物研發可視化仿真》(Molecular Operating Environment v2008.10)[光盤鏡像]
- [生活圖書]《鹽療治百病》掃描版[PDF]
- [英語學習資料]Boys Noize -《Oi Oi Oi》[MP3] 資料下載
- 《系統與硬件信息查看工具》(xScan )v3.1.2 Mac OS X[壓縮包]
- 《系統分析測試軟件家庭專業版》(SiSoftware Sandra Pro Home)v2010.10.16.67多國語言零售版/含注冊機[壓縮包]
- 《系統維護工具》(TechTool Pro)v6.0.4[光盤鏡像]
- 《深山紅葉PE系統工具箱》更新V32[光盤鏡像]
- 《創建個性化桌面工具軟件》(Ashampoo Gadge It)v1.0.1[壓縮包]
- 《注冊表清理優化軟件》(WinMend Registry Cleaner )v1.6.3[壓縮包]
- 《Windows系統恢復啟動光盤集成工具》(LSoft Active@Boot Disk Suite )V4.1.4 Retail [壓縮包]
- 《硬盤空間管理工具》(JAM Software SpaceObServer)v4.1.1.355/零售版[壓縮包]
- 《磁盤碎片整理軟件》(Diskeeper Pro Premier 2011 )v15.0.966.0 x86|x64[壓縮包]
- 《個人電腦還原系統》(FarStone RestoreIT 2013)v20130205 Win8[壓縮包]
- 《注冊表清理修復系統優化軟件》(NETGATE Registry Cleaner )v3.0.805[壓縮包]
- 《系統優化(集成修復防護)軟件》(Avanquest Fix-It Utilities™ 9 Professional)V9.24官方英文注冊版/更新v9.0.4.4[光盤鏡像]
免責聲明:本網站內容收集於互聯網,本站不承擔任何由於內容的合法性及健康性所引起的爭議和法律責任。如果侵犯了你的權益,請通知我們,我們會及時刪除相關內容,謝謝合作! 聯系信箱:[email protected]
Copyright © 電驢下載基地 All Rights Reserved