| 《NUKE_MAYA逼真三維場景合成》(DT Compositing 3D into Video in Maya and Nuke)[壓縮包] | |
|---|---|
| 下載分級 | 其他资源 |
| 資源類別 | 電腦基礎 |
| 發布時間 | 2017/7/13 |
| 大 小 | - |
《NUKE_MAYA逼真三維場景合成》(DT Compositing 3D into Video in Maya and Nuke)[壓縮包] 簡介: 中文名 : NUKE_MAYA逼真三維場景合成 英文名 : DT Compositing 3D into Video in Maya and Nuke 資源格式 : 壓縮包 學校 : Digital Tutors 主講人 : Digital Tutors 發行日期 : 2010年 地區 : 美國 對白語言 : 英語 文字語言 : 英文 簡介 : 在這一系列的教訓,我
電驢資源下載/磁力鏈接資源下載:
全選
"《NUKE_MAYA逼真三維場景合成》(DT Compositing 3D into Video in Maya and Nuke)[壓縮包]"介紹
中文名: NUKE_MAYA逼真三維場景合成
英文名: DT Compositing 3D into Video in Maya and Nuke
資源格式: 壓縮包
學校: Digital Tutors
主講人: Digital Tutors
發行日期: 2010年
地區: 美國
對白語言: 英語
文字語言: 英文
簡介:
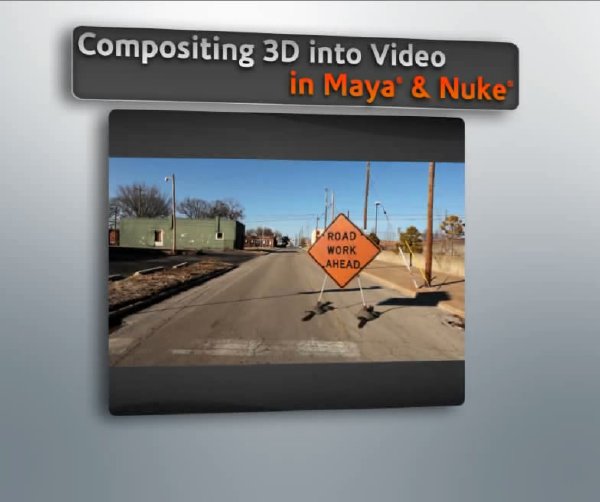
在這一系列的教訓,我們將學習如何從一個應用程序的議案跟蹤輸出和輸入我們在Nuke原畫面的三維模型和輕型,渲染和合成它。
我們將首先建立我們的議案追蹤加入原畫面和調整,使工作更容易的一切場景這個項目。然後,我們將引入我們的3D對象,並學習如何把它在我們的場景。然後我們將學習如何創建地面照明幾何和創造符合我們原來的拍攝。然後我們將創建多個渲染通道和層次,使合成更容易。當我們提供,我們會跳進杜克魯克,並且了解陰影匹配,霧色的使用情況和各種技術等多方面的話題,以配合我們的行動與我們的生活背面板的三維渲染。我們將完成與全球色彩正確的,現實的運動模糊添加完成我們的拍攝。
In this series of lessons we'll learn how to take the output from a motion tracker app and import a 3D model and light, render and composite it into our original footage in Nuke.
We'll begin this project by setting up our motion tracked scene by adding the original footage and aligning everything to make working easier. We'll then bring in our 3d object and learn how to place it in our scene. We'll then learn how to create ground geometry and create lighting that matches our original shot. We'll then create multiple render passes and layers to make compositing much easier. After we render, we'll jump into Nuke and learn about such topics as shadow matching, color matte usage and various techniques to match our 3d render with our live action back-plate. We'll finish with a global color correct and add realistic motion blur to finish our shot.
目錄:
1。介紹和項目概況
2。我們設置圖像平面來測試我們的跟蹤點雲
3。鎖定我們的相機,並在網格定位器
4。導入我們的目標,並將其納入它的場景
5。創建地面平面幾何捕捉陰影
6。使我們的環境和配套照明人類發展報告
7。擴大我們的地平面以及加入遏制
8。建立我們的基本色層和通行證
9。創建一個地面和周圍物體遮擋層
10。建設我們的兩個陰影渲染層的控制
11。創建一個顏色亞光層捕捉不同的部分
12。創建一個運動矢量層和輸出是正確的
13。使我們的渲染設置和渲染最後修改
14。改組為我們提供的所有頻道的圖像
15。更快的渲染序列合成一EXR
16。導入我們的鏡頭,創造雙樹工作流程
17。匹配我們用我們的鏡頭陰影陰影遮罩
18。應用與色彩校正技術,環境閉塞
19。我們的標志顏色合成通行證
20。使用彩色亞光通過扭捏標志
21。順化轉移到正確的色彩空間的腿
22。顏色校正生銹基地
23。加入固定噪聲和重彩糾正沙袋
24。我們的對象中添加Lightwrap
25。使用我們的運動矢量添加運動模糊
26。創造一個有背景的運動矢量面具
27。創建和渲染電影看我們的最終序列
1. Introduction and Project Overview
2. Setting our image plane to test our tracked point cloud
3. Locking our Camera and Locators to the grid
4. Importing our object and integrating it into the scene
5. Creating ground plane geometry to catch shadows
6. Bringing in our HDR Environment and matching lighting
7. Extending our ground plane and adding a curb
8. Setting up our basic color layer and passes
9. Creating a ground and object ambient occlusion layer
10. Building our two Shadow render layers for control
11. Creating a Color Matte layer to capture different pieces
12. Creating a motion vector layer and outputting it correctly
13. Making final changes to our Render Settings and rendering
14. Shuffling all our rendered images into channels
15. Rendering an EXR sequence for faster compositing
16. Importing our footage and create a dual tree workflow
17. Matching our footage shadows using our shadow mattes
18. Applying ambient occlusion with color correction techniques
19. Compositing our sign color passes
20. Using the Color Matte pass to tweak the sign
21. Hue Shifting the Legs into the correct color space
22. Color Correcting the rusty base
23. Fixing the sandbags by adding noise and heavy color correcting
24. Adding Lightwrap to our object
25. Using our motion vectors to add motion blur
26. Creating a motion vector mask for the background
27. Creating a Film look and rendering our final sequence
英文名: DT Compositing 3D into Video in Maya and Nuke
資源格式: 壓縮包
學校: Digital Tutors
主講人: Digital Tutors
發行日期: 2010年
地區: 美國
對白語言: 英語
文字語言: 英文
簡介:
在這一系列的教訓,我們將學習如何從一個應用程序的議案跟蹤輸出和輸入我們在Nuke原畫面的三維模型和輕型,渲染和合成它。
我們將首先建立我們的議案追蹤加入原畫面和調整,使工作更容易的一切場景這個項目。然後,我們將引入我們的3D對象,並學習如何把它在我們的場景。然後我們將學習如何創建地面照明幾何和創造符合我們原來的拍攝。然後我們將創建多個渲染通道和層次,使合成更容易。當我們提供,我們會跳進杜克魯克,並且了解陰影匹配,霧色的使用情況和各種技術等多方面的話題,以配合我們的行動與我們的生活背面板的三維渲染。我們將完成與全球色彩正確的,現實的運動模糊添加完成我們的拍攝。
In this series of lessons we'll learn how to take the output from a motion tracker app and import a 3D model and light, render and composite it into our original footage in Nuke.
We'll begin this project by setting up our motion tracked scene by adding the original footage and aligning everything to make working easier. We'll then bring in our 3d object and learn how to place it in our scene. We'll then learn how to create ground geometry and create lighting that matches our original shot. We'll then create multiple render passes and layers to make compositing much easier. After we render, we'll jump into Nuke and learn about such topics as shadow matching, color matte usage and various techniques to match our 3d render with our live action back-plate. We'll finish with a global color correct and add realistic motion blur to finish our shot.
目錄:
1。介紹和項目概況
2。我們設置圖像平面來測試我們的跟蹤點雲
3。鎖定我們的相機,並在網格定位器
4。導入我們的目標,並將其納入它的場景
5。創建地面平面幾何捕捉陰影
6。使我們的環境和配套照明人類發展報告
7。擴大我們的地平面以及加入遏制
8。建立我們的基本色層和通行證
9。創建一個地面和周圍物體遮擋層
10。建設我們的兩個陰影渲染層的控制
11。創建一個顏色亞光層捕捉不同的部分
12。創建一個運動矢量層和輸出是正確的
13。使我們的渲染設置和渲染最後修改
14。改組為我們提供的所有頻道的圖像
15。更快的渲染序列合成一EXR
16。導入我們的鏡頭,創造雙樹工作流程
17。匹配我們用我們的鏡頭陰影陰影遮罩
18。應用與色彩校正技術,環境閉塞
19。我們的標志顏色合成通行證
20。使用彩色亞光通過扭捏標志
21。順化轉移到正確的色彩空間的腿
22。顏色校正生銹基地
23。加入固定噪聲和重彩糾正沙袋
24。我們的對象中添加Lightwrap
25。使用我們的運動矢量添加運動模糊
26。創造一個有背景的運動矢量面具
27。創建和渲染電影看我們的最終序列
1. Introduction and Project Overview
2. Setting our image plane to test our tracked point cloud
3. Locking our Camera and Locators to the grid
4. Importing our object and integrating it into the scene
5. Creating ground plane geometry to catch shadows
6. Bringing in our HDR Environment and matching lighting
7. Extending our ground plane and adding a curb
8. Setting up our basic color layer and passes
9. Creating a ground and object ambient occlusion layer
10. Building our two Shadow render layers for control
11. Creating a Color Matte layer to capture different pieces
12. Creating a motion vector layer and outputting it correctly
13. Making final changes to our Render Settings and rendering
14. Shuffling all our rendered images into channels
15. Rendering an EXR sequence for faster compositing
16. Importing our footage and create a dual tree workflow
17. Matching our footage shadows using our shadow mattes
18. Applying ambient occlusion with color correction techniques
19. Compositing our sign color passes
20. Using the Color Matte pass to tweak the sign
21. Hue Shifting the Legs into the correct color space
22. Color Correcting the rusty base
23. Fixing the sandbags by adding noise and heavy color correcting
24. Adding Lightwrap to our object
25. Using our motion vectors to add motion blur
26. Creating a motion vector mask for the background
27. Creating a Film look and rendering our final sequence
- 上一頁:《3Dsmax2011中文視頻教程》(3DS max 2011)[WMV]
- 下一頁:《NUK與MAYA高級合成教程》(DT Advanced Compositing Workflows with Maya and Nuke)[壓縮包]
相關資源:
- [電腦基礎]《Adobe Flash Professional CS6 新功能視頻教程》(Lynda.com Flash Professional CS6 New Features)[光盤鏡像]
- [生活百科]金庸傳奇 鐘曉毅 費勇
- [電腦基礎]《兩天學會五筆字型》隨書光盤[ISO]
- [電腦基礎]《Digital Tutors - Maya恐龍UV貼圖教程》(Digital Tutors UV Mapping Workflows In Maya)ISO[光盤鏡像]
- [生活百科]《電視游戲大師》掃描版[PDF] 資料下載
- [電腦基礎]《Maya低多邊形建模紋理教程》(SimplyMaya Low Poly UV layout and Texturing)
- [電腦基礎]《游戲人物創建》(Game Character Animation All In One)
- [電腦基礎]《企業網絡應用解決方案》書籍配套光盤[ISO]
- [生活百科]輕公司:互聯網變革中國制造 (李黎/杜晨)
- [生活百科]《吃主兒》(Chi Zhu Er)[PDF] 資料下載
- [生活圖書]《青春長征路:青少年不可不知的長征故事》掃描版[PDF]
- [電腦基礎]《XSI光照效果教程》(Digital Tutors Introduction To Lighting In XSI)[Bin]
- [電腦基礎]《電腦常見問題與故障1000例》[PDF]
- [人文社科]《【更新3本】美國大學入學指南2010版》(Fiske Guide to Colleges 2010)(Edward Fiske)掃描版[PDF]
- [光盤游戲]《信長之野望12革新威力加強完美二合一版》(Nobu 12 PK Japanese)[ISO]
- [生活圖書]《楊式太極拳術述真》掃描版[PDF]
- [游戲綜合]《創意族賽車》(Mod Nation Racers)中英文合版[PSP]
- [文學圖書]《筆友》(衛斯理)文字版[PDF]
- [光盤游戲]《伐木工模擬2012》(Woodcutter Simulator 2012)[光盤鏡像]
- [人文社科]《美女餐廳5:繁榮》(Diner Dash 5: BOOM! - Collectors Edition)v1.0.1.295典藏版[壓縮包]
- 《分析電影短片的制作視頻教程》(The Gnomon Workshop Anatomy of a Short Film Vol. 2)[光盤鏡像]
- 《電腦報》2014年第08期(中國.IT.硬件在日本)
- 《Lynda.com Photoshop CS3新功能教學之一》(Lynda.com Photoshop CS3 One-on-One:The Essentials DVD-VIH)[ISO]
- 《微軟technet廣播視頻合集打包下載》[壓縮包]
- 《瘋狂軟件Struts2視頻》(Struts2)2014最新版[WMV]
- 《數據結構教程 清華嚴蔚敏主講》MP4播放版 逃課90後有福了 更新完畢 祝湯陰一中高三學生高考順利!
- 《Programming Microsoft Windows with Visual Basic .NET俄文版》(Programming Microsoft Windows with Visual Basic .NET Russian)
- 《Photoshop圖像設計聲像教程》[zip]
- 《MAYA初級教程》(DV.GARAGE.MAYA.LAB.VOL.1-AG)[Bin]
- 《巧學巧用Excel 2003公式與函數》[PDF]
- 《After Effects動畫手臂角色綁定教程 》(Lynda.com After Effects Rigging a Character Arm for Animation)[光盤鏡像]
- 《SolidWorks視頻教程》(SolidWorks Video Tutorial Volume 1)2007[Bin]
免責聲明:本網站內容收集於互聯網,本站不承擔任何由於內容的合法性及健康性所引起的爭議和法律責任。如果侵犯了你的權益,請通知我們,我們會及時刪除相關內容,謝謝合作! 聯系信箱:[email protected]
Copyright © 電驢下載基地 All Rights Reserved